Membangun Self-Managed Database Server di AWS EC2
Panduan membangun database server mandiri di AWS EC2. Pelajari konfigurasi security group, instalasi LAMP Stack, setup MySQL/MariaDB, deployment aplikasi CRUD, dan best practices keamanan untuk environment production.
Pengantar
Dokumen teknis ini menyajikan panduan untuk membangun dan mengonfigurasi self-managed database server menggunakan Amazon EC2. Implementasi ini mencakup provisioning instance, konfigurasi security group, instalasi LAMP stack, serta deployment aplikasi database-driven dengan arsitektur CRUD (Create, Read, Update, Delete).
1. Konfigurasi Security Group
1.1 Spesifikasi Aturan Jaringan
Security group dikonfigurasi dengan aturan inbound yang memungkinkan akses ke layanan essential. Konfigurasi ini diperlukan untuk memastikan konektivitas yang tepat sambil mempertahankan aksesibilitas sistem.
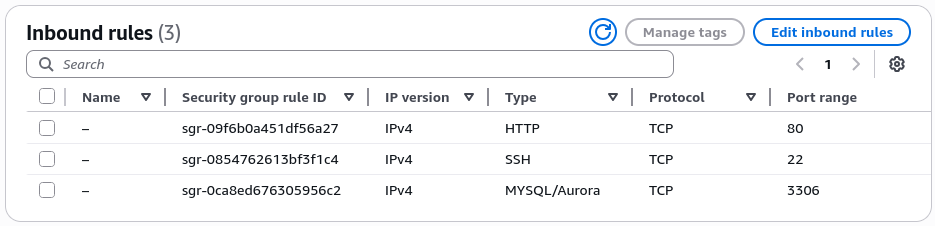
Spesifikasi Rules Inbound:
- SSH (Port 22): 0.0.0.0/0 - Akses remote administration
- HTTP (Port 80): 0.0.0.0/0 - Layanan web server
- MySQL/Aurora (Port 3306): 0.0.0.0/0 - Koneksi database
2. Provisioning EC2 Instance
2.1 Spesifikasi Teknis Instance
Instance EC2 diprovision dengan konfigurasi berikut untuk menunjang workload database:
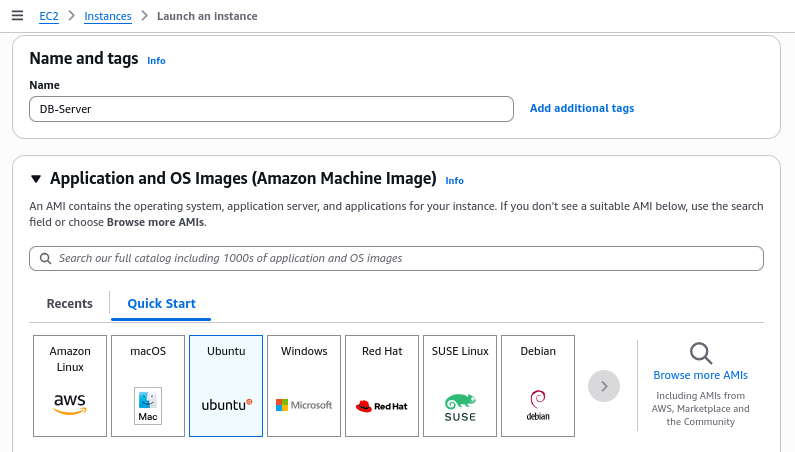
Parameter Konfigurasi:
- Amazon Machine Image (AMI): Ubuntu Server
- Instance Type: Disesuaikan dengan kebutuhan workload database
- Key Pair: vockey (existing key pair untuk SSH access)
2.2 Manajemen Key Pair
Key pair digunakan untuk autentikasi SSH yang aman ke instance EC2.

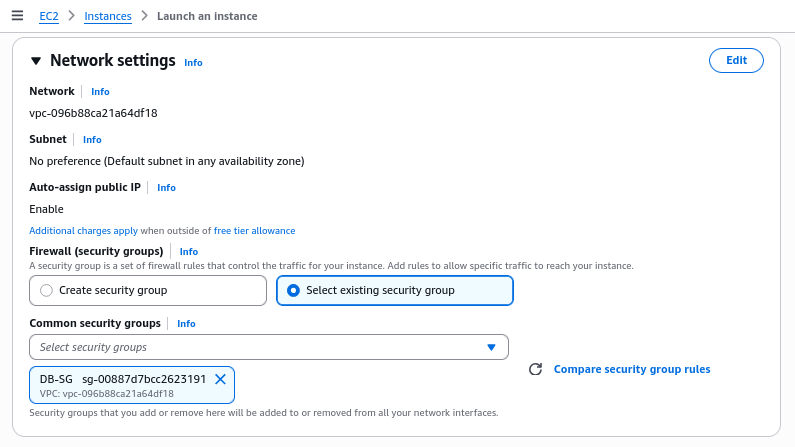
2.3 Konfigurasi Jaringan
Instance dikaitkan dengan security group yang telah dibuat sebelumnya untuk memastikan aturan firewall yang konsisten.
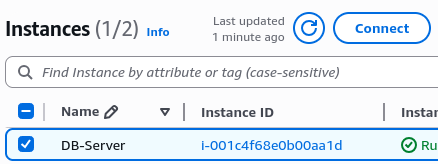
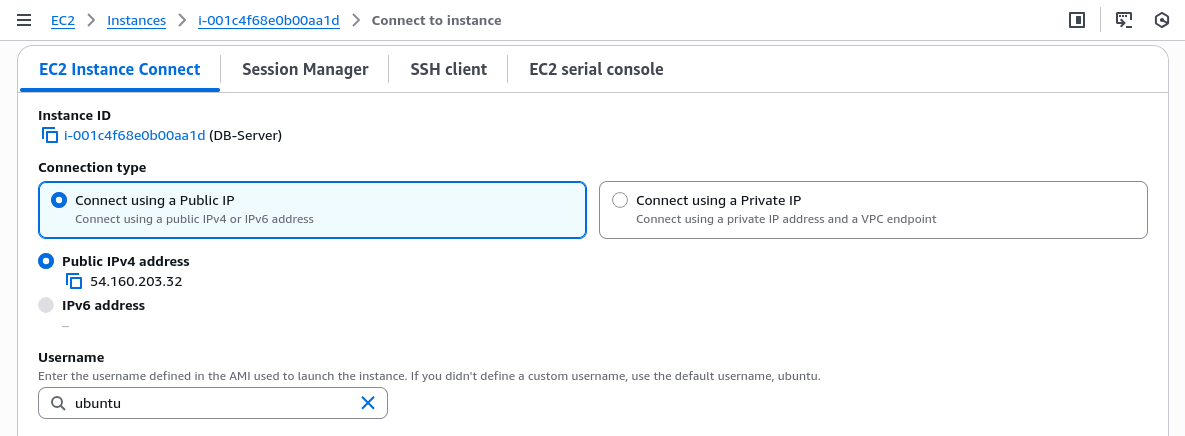
3. Koneksi ke Instance
3.1 Koneksi
Akses instance EC2:
AWS EC2 Instance Connect:
4. Instalasi dan Konfigurasi LAMP Stack
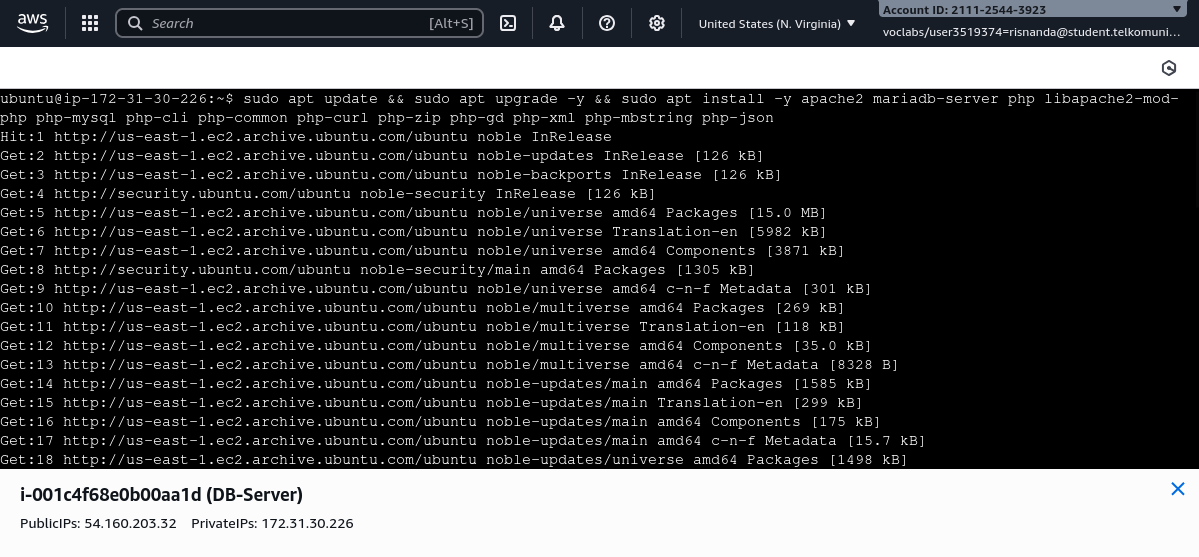
4.1 Persiapan Sistem
Update package manager dan sistem packages:
1
sudo apt update && sudo apt upgrade -y
4.2 Deployment Komponen LAMP
Dua opsi instalasi tersedia berdasarkan kebutuhan:
Opsi 1 (Installasi Lengkap):
1
sudo apt install -y apache2 mariadb-server php libapache2-mod-php php-mysql php-cli php-common php-curl php-zip php-gd php-xml php-mbstring php-json
Opsi 2 (Installasi Minimal):
1
sudo apt install -y mariadb-server apache2 php libapache2-mod-php php-mysql php-curl php-json
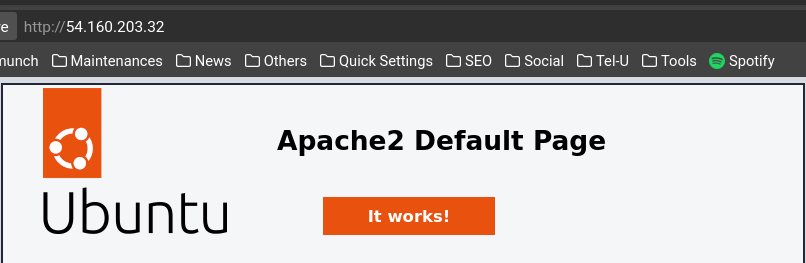
4.3 Validasi Instalasi
Akses public IP instance melalui web browser untuk memverifikasi Apache berjalan dengan benar:
5. Konfigurasi Database Server
5.1 Hardening Keamanan MySQL
Jalankan script keamanan untuk mengamankan instalasi MySQL:
1
sudo mysql_secure_installation
Output Eksekusi:
1
2
3
4
5
6
7
8
9
10
11
12
13
14
15
16
17
18
19
20
21
22
23
24
25
26
27
28
29
30
31
32
33
34
35
36
37
38
39
40
41
42
43
44
45
46
47
48
49
50
51
52
53
54
55
56
57
58
59
60
NOTE: RUNNING ALL PARTS OF THIS SCRIPT IS RECOMMENDED FOR ALL MariaDB
      SERVERS IN PRODUCTION USE!  PLEASE READ EACH STEP CAREFULLY!

In order to log into MariaDB to secure it, we'll need the current
password for the root user. If you've just installed MariaDB, and
haven't set the root password yet, you should just press enter here.

Enter current password for root (enter for none):
OK, successfully used password, moving on...

Setting the root password or using the unix_socket ensures that nobody
can log into the MariaDB root user without the proper authorisation.

You already have your root account protected, so you can safely answer 'n'.

Switch to unix_socket authentication [Y/n] n
 ... skipping.

You already have your root account protected, so you can safely answer 'n'.

Change the root password? [Y/n] n
 ... skipping.

By default, a MariaDB installation has an anonymous user, allowing anyone
to log into MariaDB without having to have a user account created for
them.  This is intended only for testing, and to make the installation
go a bit smoother.  You should remove them before moving into a
production environment.

Remove anonymous users? [Y/n] y
 ... Success!

Normally, root should only be allowed to connect from 'localhost'.  This
ensures that someone cannot guess at the root password from the network.

Disallow root login remotely? [Y/n] y
 ... Success!

By default, MariaDB comes with a database named 'test' that anyone can
access.  This is also intended only for testing, and should be removed
before moving into a production environment.

Remove test database and access to it? [Y/n] y
 - Dropping test database...
 ... Success!
 - Removing privileges on test database...
 ... Success!

Reloading the privilege tables will ensure that all changes made so far
will take effect immediately.

Reload privilege tables now? [Y/n] y
 ... Success!

Cleaning up...

All done!  If you've completed all of the above steps, your MariaDB
installation should now be secure.

Thanks for using MariaDB!
5.2 Koneksi ke MySQL Server
1
sudo mysql -u root -p
Untuk environment production, sangat disarankan menggunakan strong password dan tidak mengosongkan field password.
5.3 Konfigurasi Database dan User
1
2
3
4
5
CREATE DATABASE crud_app;
CREATE USER 'user'@'localhost' IDENTIFIED BY 'password';
GRANT ALL PRIVILEGES ON crud_app.* TO 'user'@'localhost';
FLUSH PRIVILEGES;
EXIT;
5.4 Schema Design dan Table Creation
1
2
3
4
5
6
7
8
9
10
USE crud_app;

CREATE TABLE users (
    id INT AUTO_INCREMENT PRIMARY KEY,
    nama VARCHAR(100) NOT NULL,
    email VARCHAR(100) UNIQUE NOT NULL,
    umur INT,
    kota VARCHAR(100),
    created_at TIMESTAMP DEFAULT CURRENT_TIMESTAMP
);
Output yang Diharapkan: Query OK, 0 rows affected (0.019 sec)
6. Deployment Aplikasi CRUD
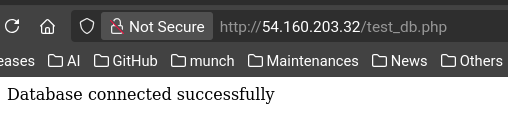
6.1 Testing Koneksi Database
Buat file test untuk memvalidasi koneksi database:
1
sudo nano /var/www/html/test_db.php
Kode Testing Koneksi:
1
2
3
4
5
6
7
8
9
10
11
12
13
<?php
$servername = "localhost";
$username = "user";
$password = "password";
$dbname = "crud_app";

$conn = new mysqli($servername, $username, $password, $dbname);

if ($conn->connect_error) {
    die("Connection failed: " . $conn->connect_error);
}
echo "Database connected successfully";
?>
URL Testing: http://your-ec2-public-ip/test_db.php
6.2 Deployment Aplikasi Principal
Buat file aplikasi utama CRUD:
1
sudo nano /var/www/html/index.php
7. Validasi Final Implementasi
Akses Aplikasi: http://your-ec2-public-ip/index.php
8. Best Practices dan Pertimbangan Keamanan
8.1 Rekomendasi untuk Environment Production
Keamanan:
- Implementasi SSL/TLS untuk enkripsi koneksi database
- Kebijakan password yang kuat dan kompleks
- Restriksi port database (3306) ke specific IP addresses saja
- Update dan patch security secara berkala
- Implementasi automated backup database
- Comprehensive monitoring dan logging
Performance:
- Optimasi configuration parameter MySQL berdasarkan workload
- Implementasi caching mechanisms (Redis, Memcached)
- Pertimbangan penggunaan Amazon RDS untuk managed database service
- Load balancing architecture untuk high availability
Kesimpulan
Dokumentasi teknis ini memberikan panduan implementasi lengkap untuk self-managed database server pada AWS EC2. Arsitektur yang dijelaskan memungkinkan organisasi untuk memiliki kontrol penuh atas environment database mereka sambil memanfaatkan infrastruktur cloud AWS. Solusi ini cocok untuk scenario yang memerlukan kustomisasi tinggi, meskipun untuk workload production critical disarankan mempertimbangkan Amazon RDS untuk mengurangi overhead management.